One of the best things about working at Temporal is seeing the look of joy on an engineer’s face when they discover how our software gives them unparalleled insight into their application’s runtime behavior.
It seems like magic at first, so this joy is often preceded by disbelief.
“Are you telling me that I can look back in time and see exactly what happened when my application ran at 6:08 PM last Friday evening?” Yes! “Wait, you’re saying that I’ll be able to see when it started, the input data provided at start, the sequence of steps it followed, how long each step took, and the result it returned upon completion?” Exactly!
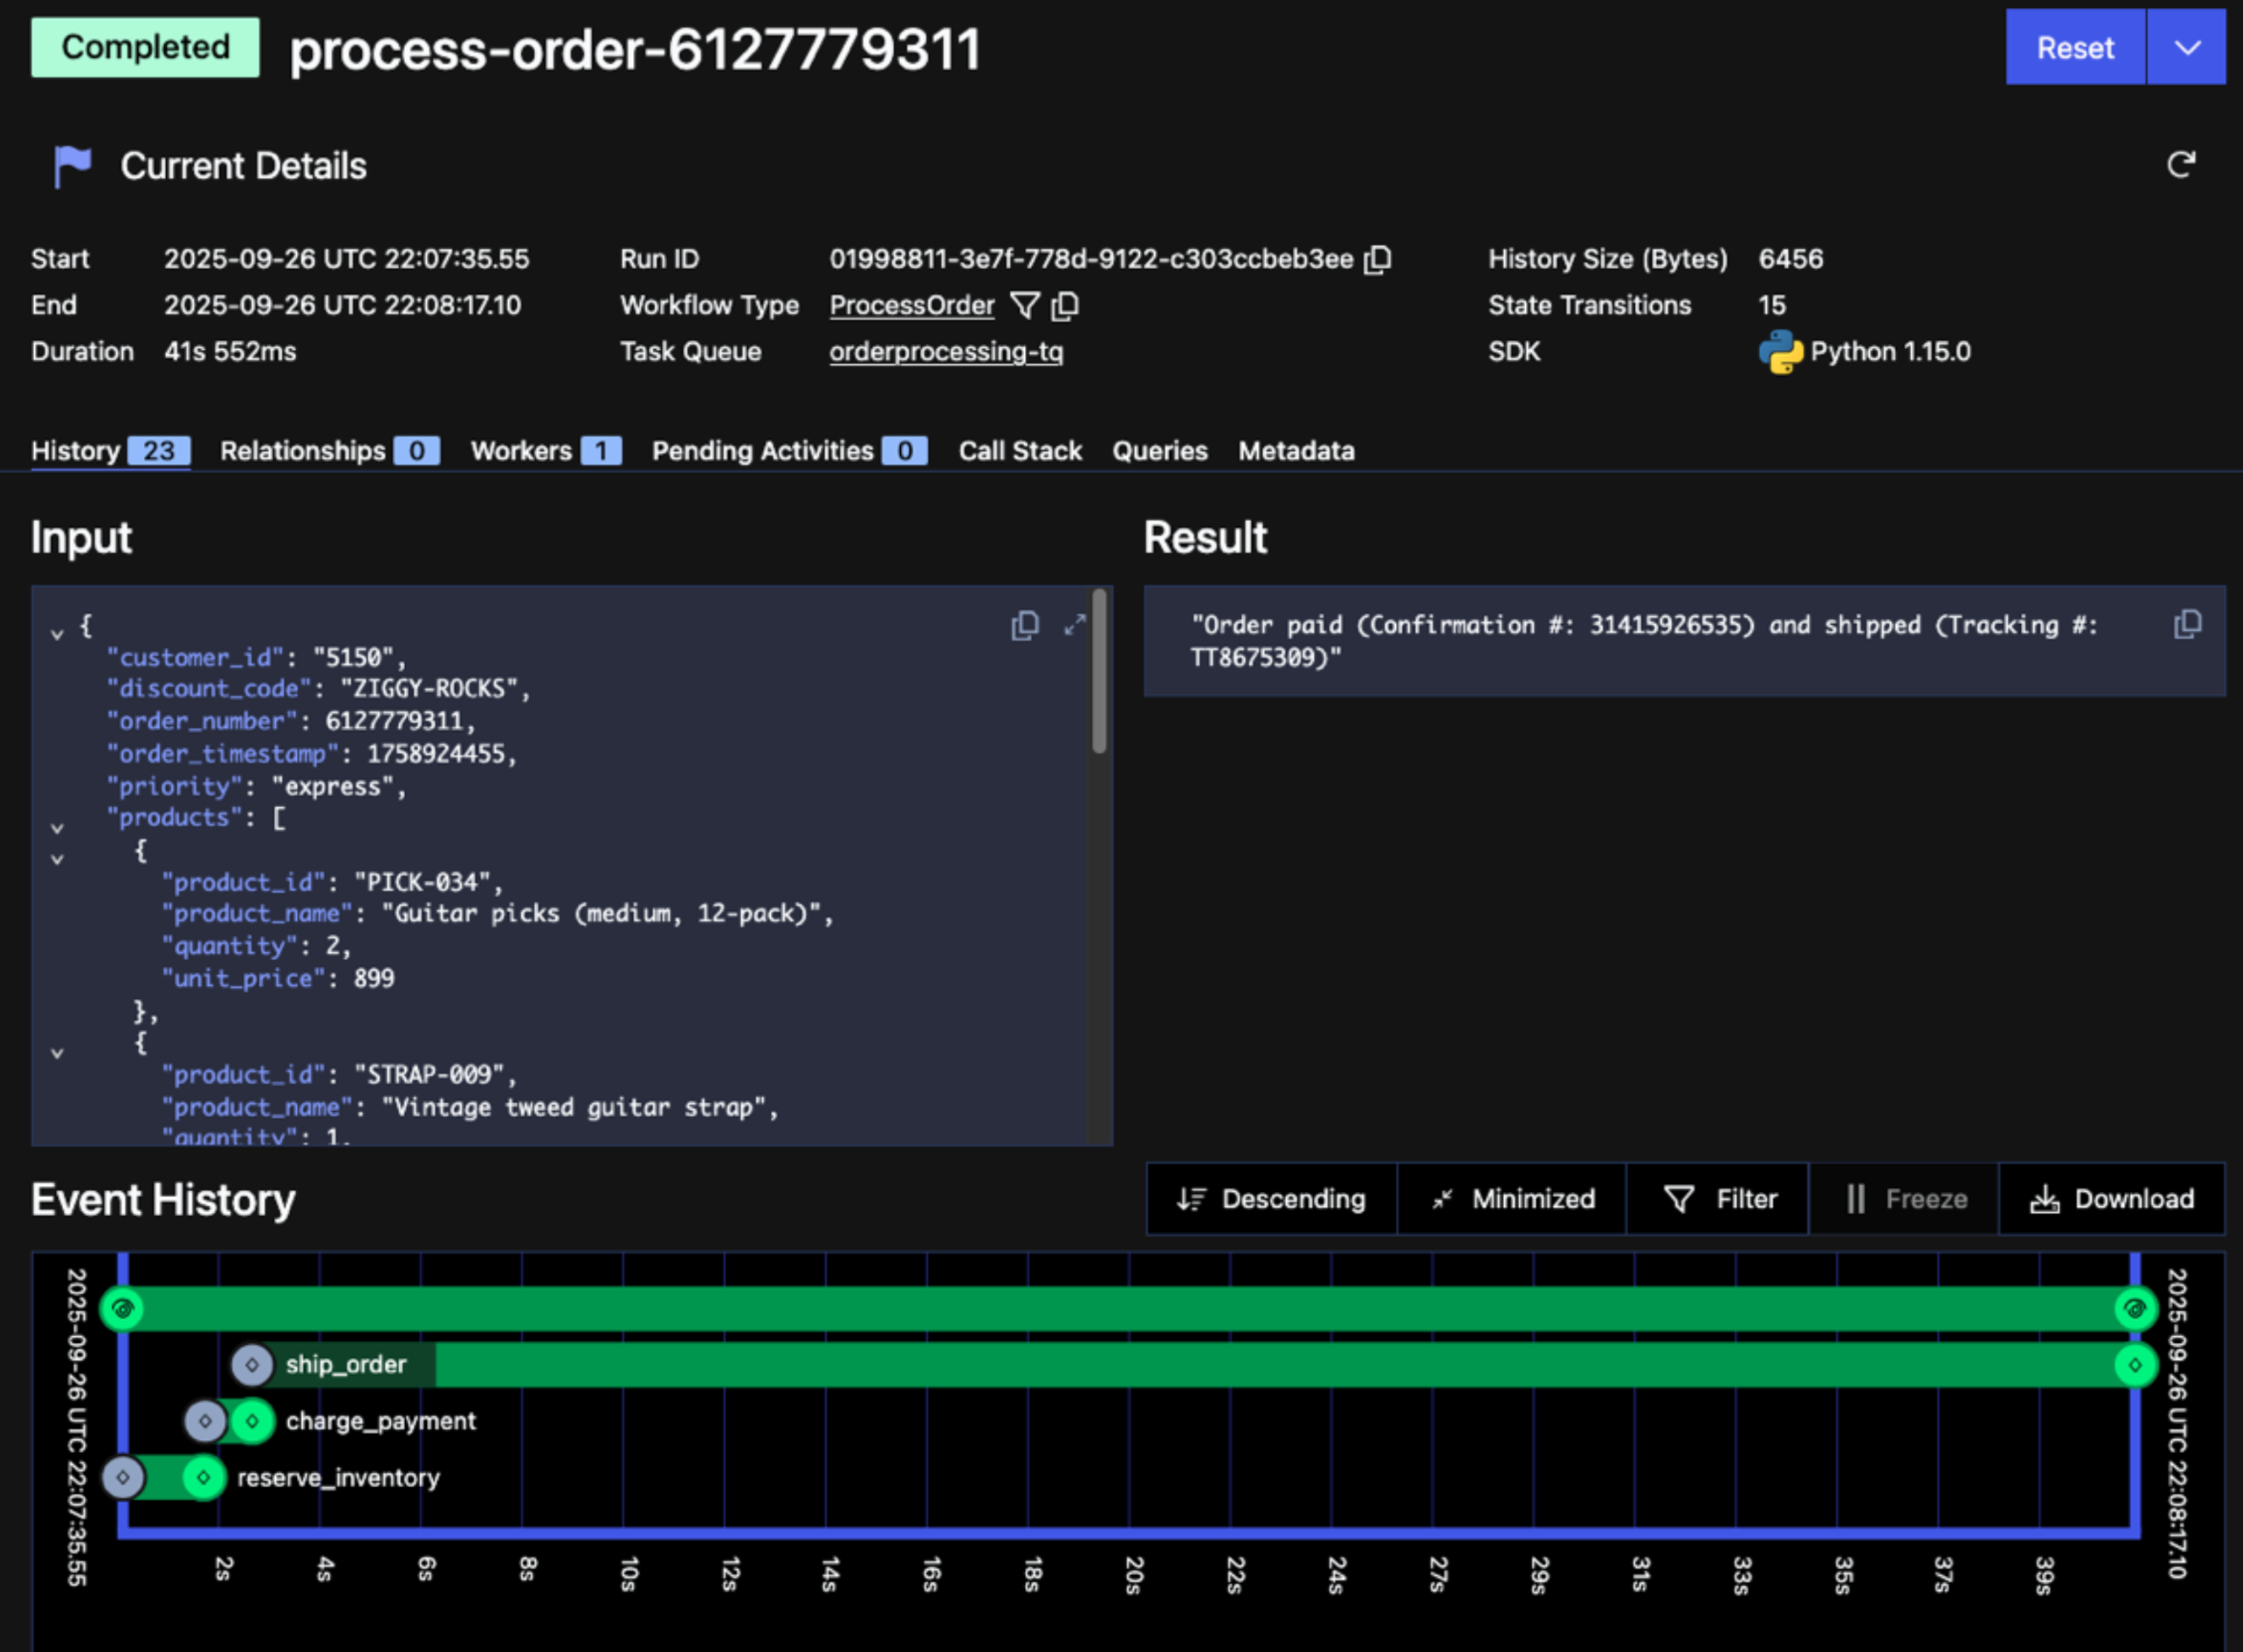
Figure 1: Screenshot of the Detail and Timeline sections of the Temporal Web UI
This information is clearly helpful for investigating application behavior, but it’s also essential to how Temporal achieves Durable Execution. It’s what enables a Temporal Workflow to overcome a crash, even one caused by hardware failure, and continue running from where it left off. From the developer’s perspective, it’s as if that crash never happened.
Our free Temporal 102 training course explains how that works. To summarize, the Worker reconstructs the pre-crash state based on details from the Event History, which tracks the input, status, and result for each significant step of the execution. The following screenshot of the Temporal Web UI shows an excerpt of the Event History for an order-processing Workflow.
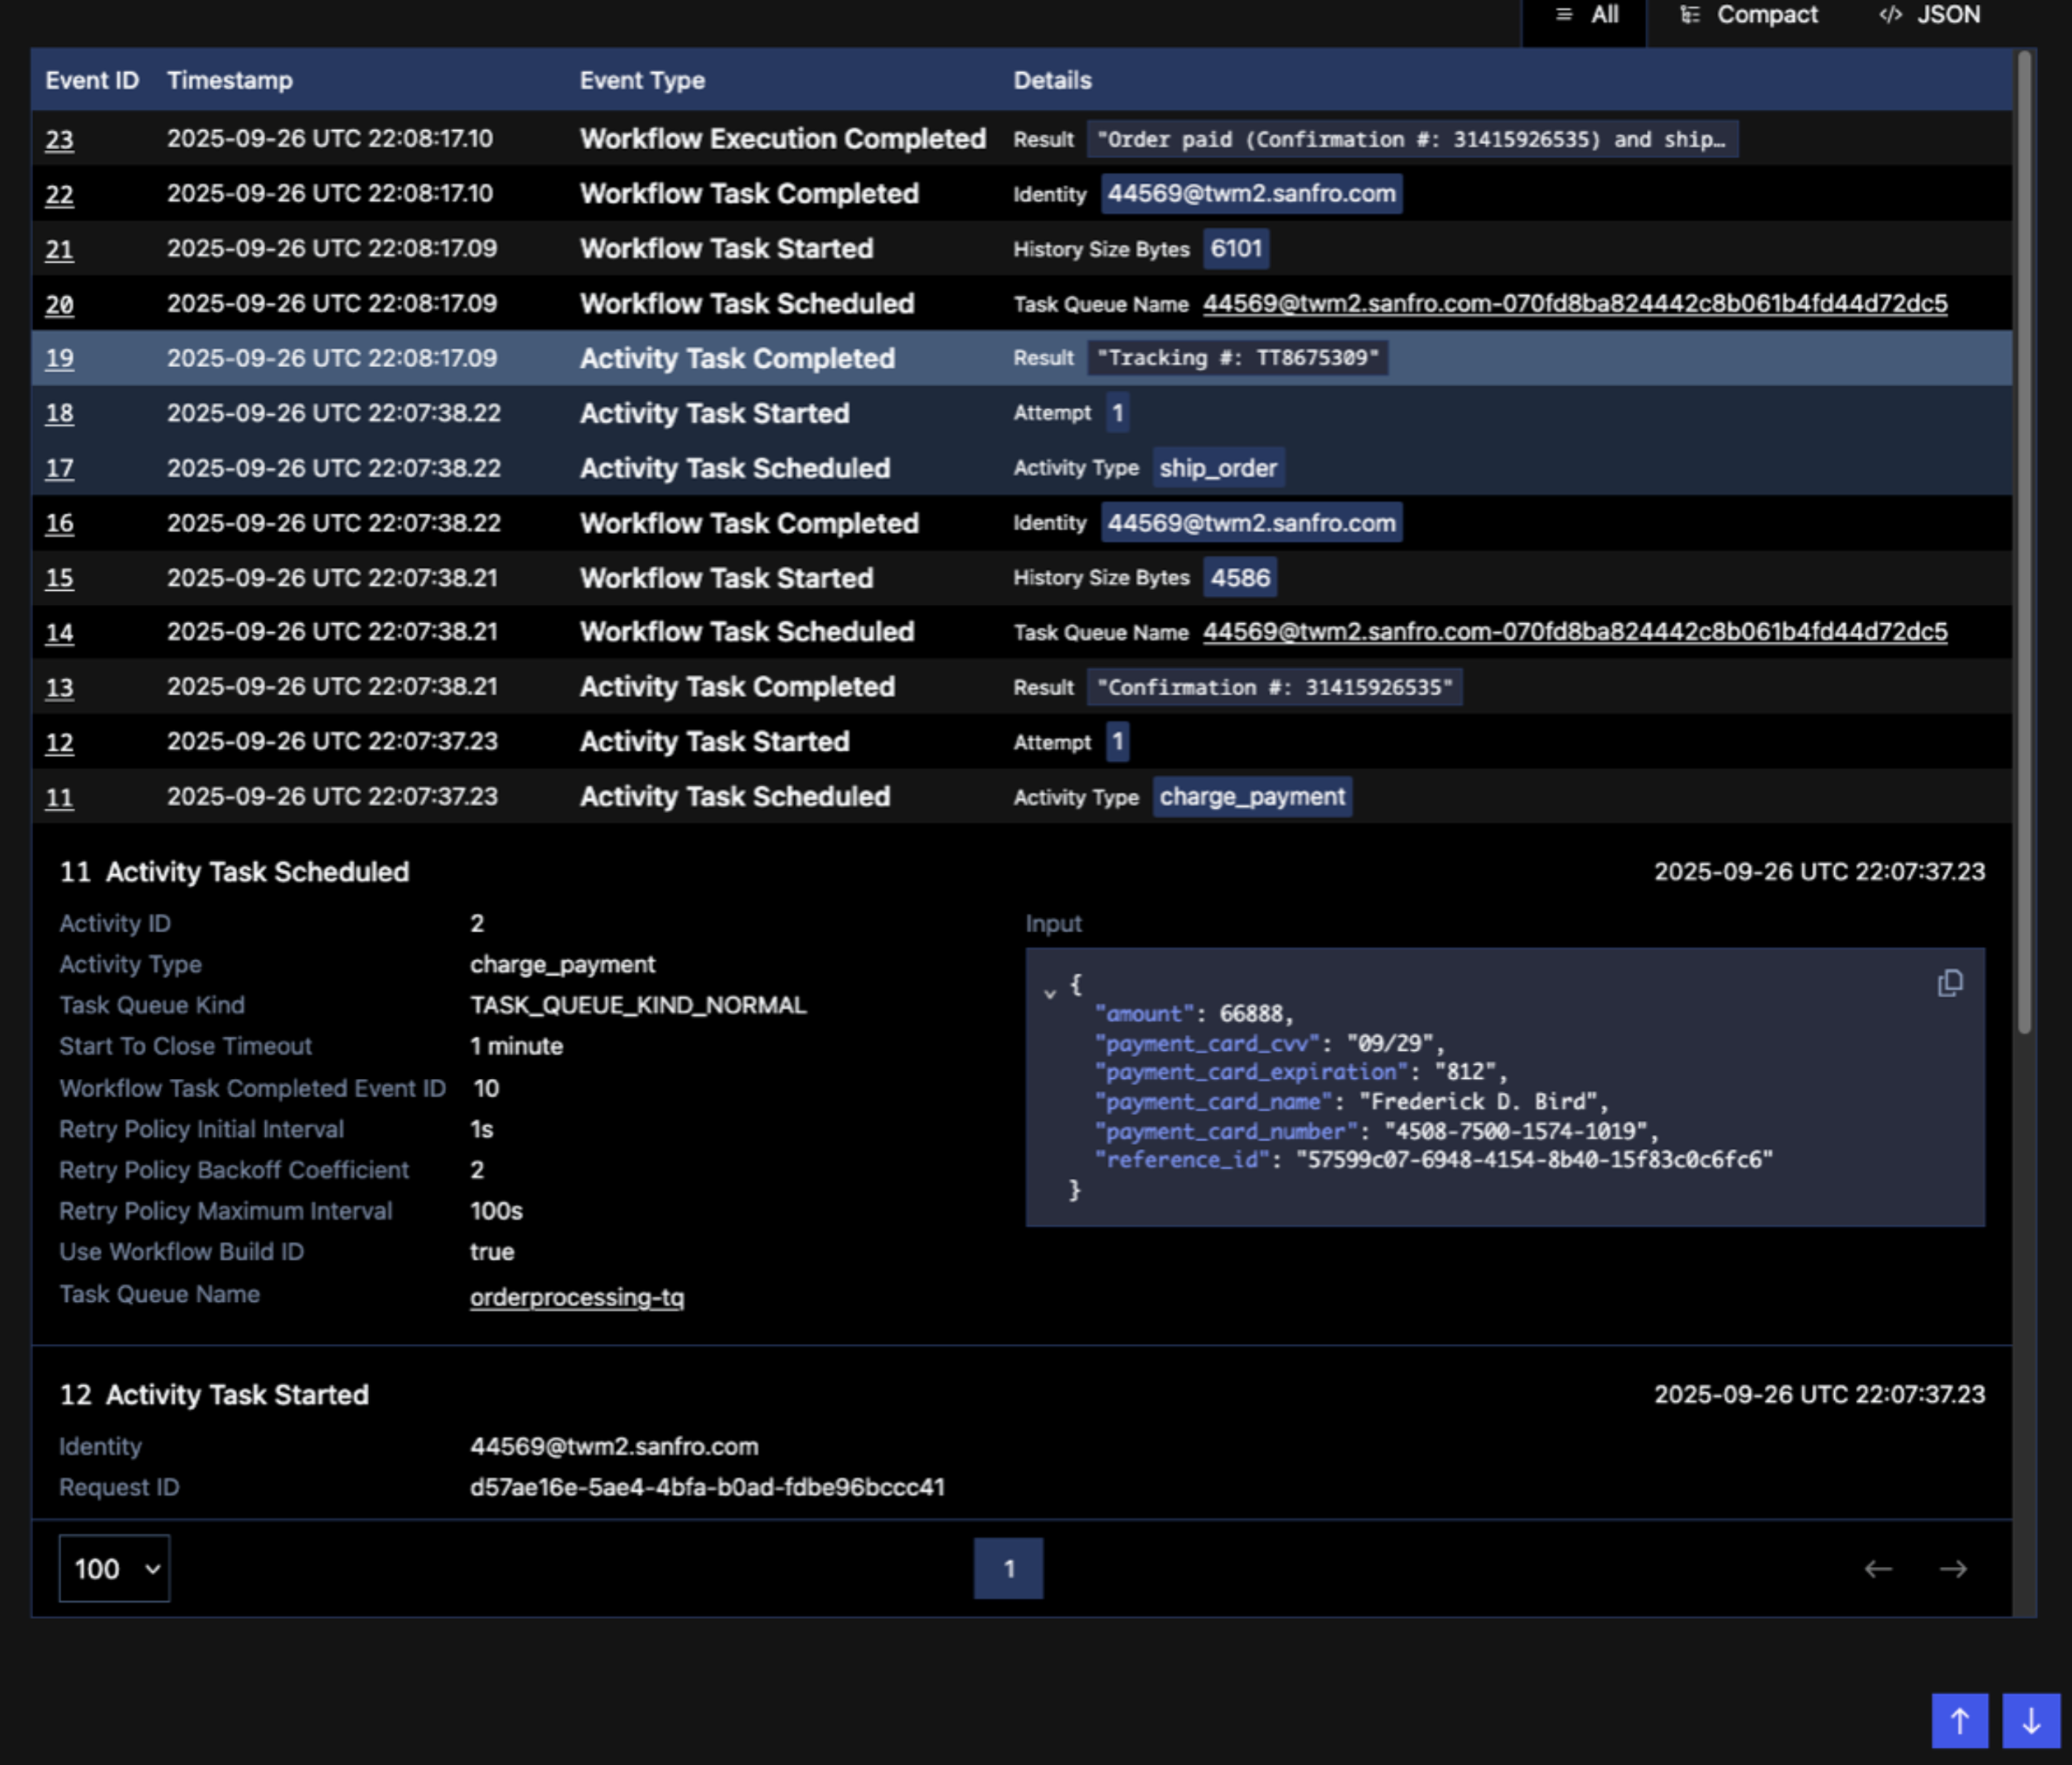
Figure 2: Screenshot of the Event History in the Temporal Web UI
In this case, the Event History contains payment card details. This is sensitive data that must be kept confidential. A variety of laws and industry regulations mandate protections for certain types of data, including financial transactions, medical records, and personally identifiable information (PII).
This raises a question: “If the Event History contains sensitive data, how can I keep it confidential?”
How can I keep sensitive data confidential in Temporal?#
Temporal offers a comprehensive, layered approach to data security. Understanding how best to protect your data starts with understanding how it flows through the system and the interactions among the three actors involved in every Workflow Execution:
- The requester is the user or application that issues a request to run the Workflow. It may also retrieve the result upon completion, as is the case in this example.
- The Temporal Service consists of one or more running instances of the Temporal Server software. This can be self-hosted, in which case the developer deploys, manages, and operates the service. Alternatively, it can be Temporal Cloud, the fully managed SaaS offering from Temporal that provides a secure, high-performance Temporal Service.
- The Worker is what executes your Workflow and Activity code. It’s part of your application and is external to the Temporal Service. Regardless of whether you use Temporal Cloud or a self-hosted Temporal Service, you deploy and manage Workers on the infrastructure of your choice.
How does the data flow in a Temporal Application?#
Figure 3: Diagram illustrating the data flow in a basic Temporal Application
- The requester initiates execution by submitting a Workflow Execution request to the Temporal Service. This specifies the type of Workflow to run and the data to supply as input. In the order-processing example above, the Workflow Type is ProcessOrder and the input data specifies the customer, products, payment details, and shipping address relevant to the order.
- Upon receiving this request, the Temporal Service adds a Workflow Task to a Task Queue that it shares with the Worker. When the Worker polls this Task Queue, it accepts the task and executes the Workflow code by invoking the ProcessOrder function with the input data specified in the task.
- When the execution is complete, the Worker reports the result back to the Temporal Service. In the example above, the result is a string that includes the order status, confirmation number, and shipment tracking number.
- The requester, which has been waiting for execution to complete, then retrieves the result from the Temporal Service.
At each step, the Temporal Service appends information about the progress of the Workflow Execution to the Event History, which is persisted to the data store associated with the Temporal Service. Temporal Cloud uses a custom-built data store called CDS, while a self-hosted Temporal Service typically uses MySQL, PostgreSQL, or Apache Cassandra.
There are two key aspects of data confidentiality in a Temporal Application: protecting data in motion as it’s transmitted across the network and protecting the data at rest when it’s persisted to this data store.
How can I protect data transmitted across the network?#
The requester uses a Temporal Client, provided by the SDK, to interact with the Temporal Service. The Temporal Web UI and CLI, which are frequently used to interact with the Temporal Service, also contain a Temporal Client.
Temporal Clients and the Temporal Service communicate using gRPC, which is unencrypted by default. This simplifies the case of running everything locally on your laptop during development, as it eliminates the need to set up digital certificates. However, this is not acceptable in a production environment, where data passing over the network between the Temporal Client and Temporal Service could be intercepted by an attacker with access to the network.
To mitigate this, the Temporal Service and Temporal Clients support the use of TLS, an industry-standard protocol also used to secure communication between web browsers and web servers. The use of TLS is optional for a self-hosted Temporal Service, but mandatory in Temporal Cloud.
TLS uses a server-side certificate, which enables the client to validate the identity of the Temporal Service. It optionally supports the use of client certificates, a configuration known as mutual authentication (mTLS), which enables both parties to authenticate one another.
TLS uses asymmetric cryptography to securely exchange a key that’s used to encrypt subsequent communications during the session. Because encryption takes place below the application layer, it effectively creates a tunnel in which all data exchanged between the Temporal Client and Temporal Service is protected from eavesdropping.
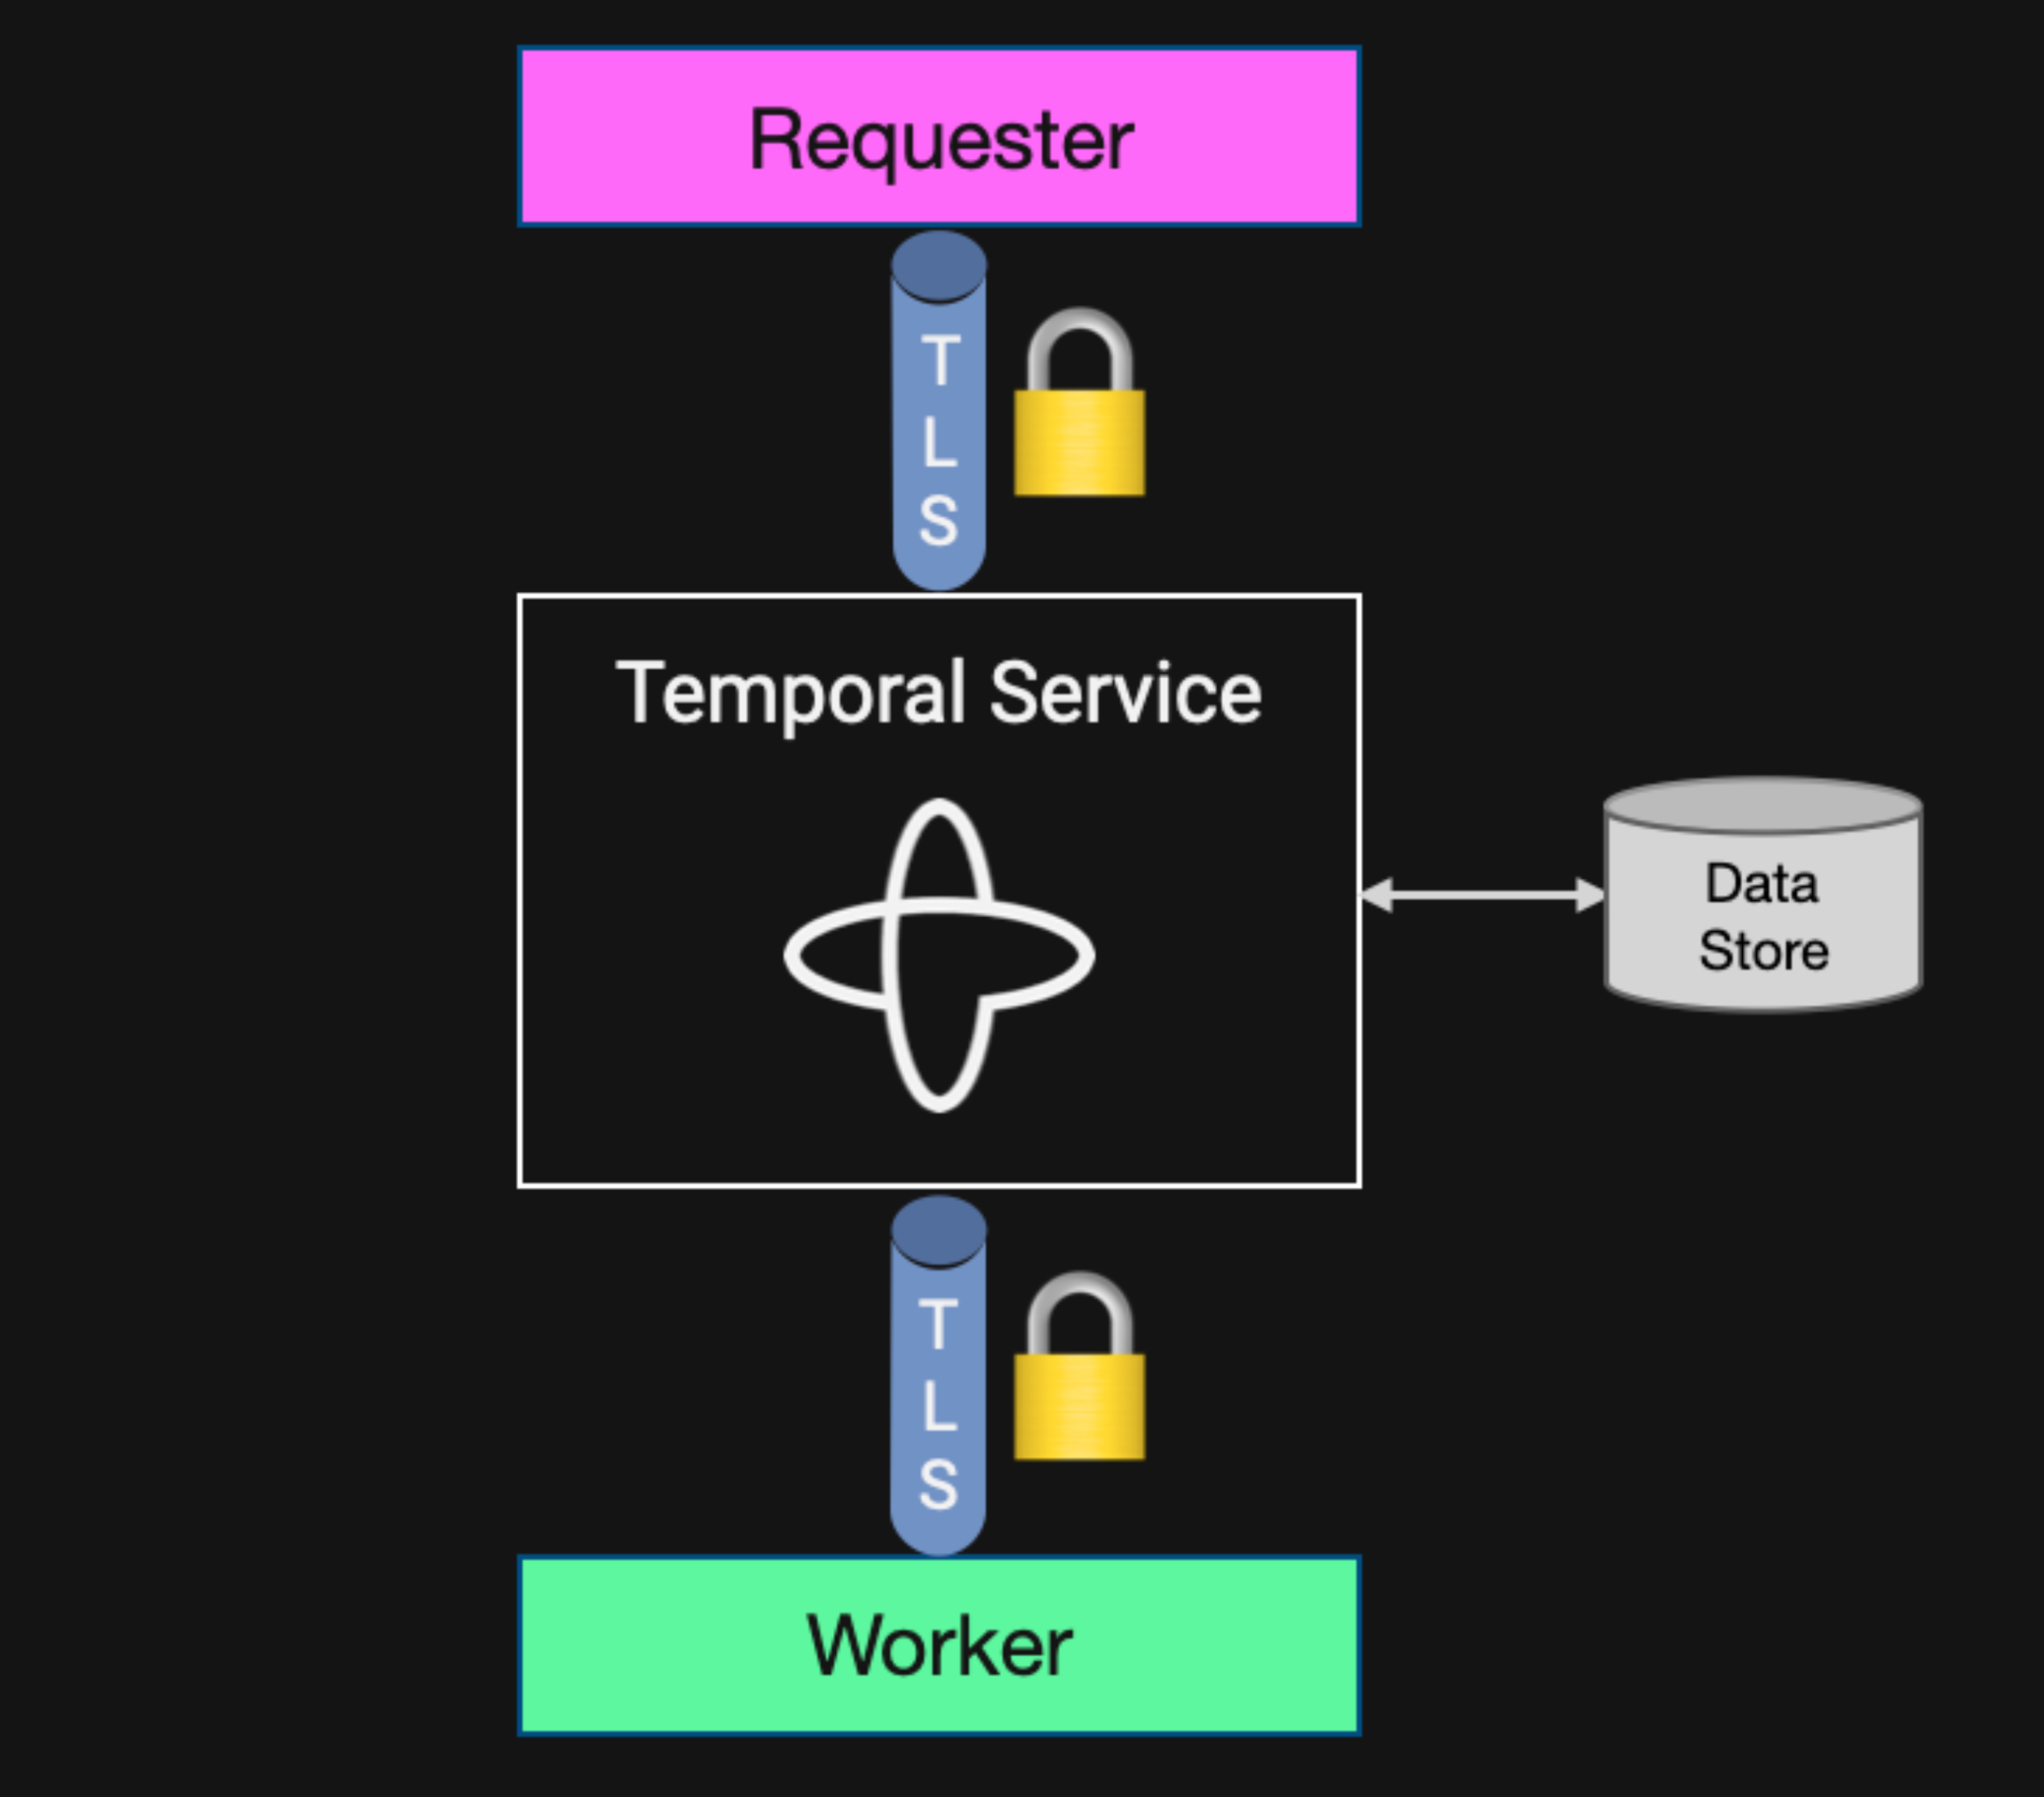
Figure 4: Diagram illustrating how TLS protects data moving between clients and the Temporal Service
However, even if you’re using TLS, any Temporal Client that can successfully issue requests within a given Namespace for the Temporal Service could potentially access input and result data for its Workflow Executions. Furthermore, since the data is decrypted upon receipt, payload data is persisted in unencrypted form to the data store. Therefore, an attacker who gains access to either the Temporal Service or its data store could potentially read sensitive information.
How can I further protect my data with Temporal?#
Temporal Cloud automatically protects data at rest using AES-256-GCM encryption. An operator of a self-hosted Temporal Service should also consider using database and/or filesystem encryption to protect their data.
Many organizations also choose to encrypt data within the application itself, which offers extra protection. Temporal SDKs support transforming data before it’s transmitted by the Temporal Client and again when it’s received. This feature is often used for application-level data encryption, ensuring that sensitive information remains protected throughout its journey.
With this approach, data is encrypted on the client side, so the Temporal Service only ever sees data in encrypted form. The Temporal Service has no ability to decrypt this data because it neither has the key nor knowledge of the cipher used. To understand how this works, consider how Temporal serializes and deserializes the data sent across the wire during a Workflow Execution.
Converters and Codecs#
A Temporal Data Converter is responsible for converting language-native values (such as strings, numbers, booleans, and custom objects) into the language-independent format that the Temporal Client sends across the network to the Temporal Service. It uses three components to achieve this, later employing them in reverse order to convert data from the response back into language-native values for the application.
The first of these three components is the Payload Converter, which serializes the data supplied as input or returned as output from the application into bytes. In other words, it serializes function parameters and return values that need to be sent over the wire and deserializes the bytes to convert this data back into their original representation. Although each Temporal SDK provides a built-in Payload Converter, developers can also create their own implementation to customize how payload data is serialized and deserialized.
The second component is a Failure Converter. Temporal handles serialization of payloads separately from serialization of failures, and it’s the Failure Converter’s job to convert between Temporal's language-agnostic (protobuf) representation of a Failure and the language-specific representation used by a given SDK. For example, the Failure Converter for the Java SDK can convert between a Temporal Failure and a java.lang.Exception instance. Although it is possible for a developer to create a custom Failure Converter, this is extremely rare in practice, as very few users require capabilities beyond what’s available in the default implementation.
The third component is a Payload Codec, which transforms the series of bytes resulting from payload conversion into a different series of bytes. The name is short for “encoder/decoder.” Codecs are commonly used to compress or encrypt messages before transmission and to decompress or decrypt them upon receipt before they're processed. Temporal supports chaining multiple Payload Codecs, so a developer could both compress and encrypt messages before they’re sent across the wire.
To summarize, a Data Converter is responsible for the overall conversion from objects to bytes. Payload Converters handle this conversion of input parameters and return values, while Failure Converters handle this conversion for Failures. Codecs apply transformations, such as compression or encryption, on the serialized bytes following the conversion.
Using a Payload Codec to encrypt data#
As mentioned above, developers can create their own Payload Codec implementation to perform application-level encryption. The following illustration includes a human-readable representation of the bytes emitted by both the Payload Converter and Payload Codec for the charge_payment Activity input data shown earlier.
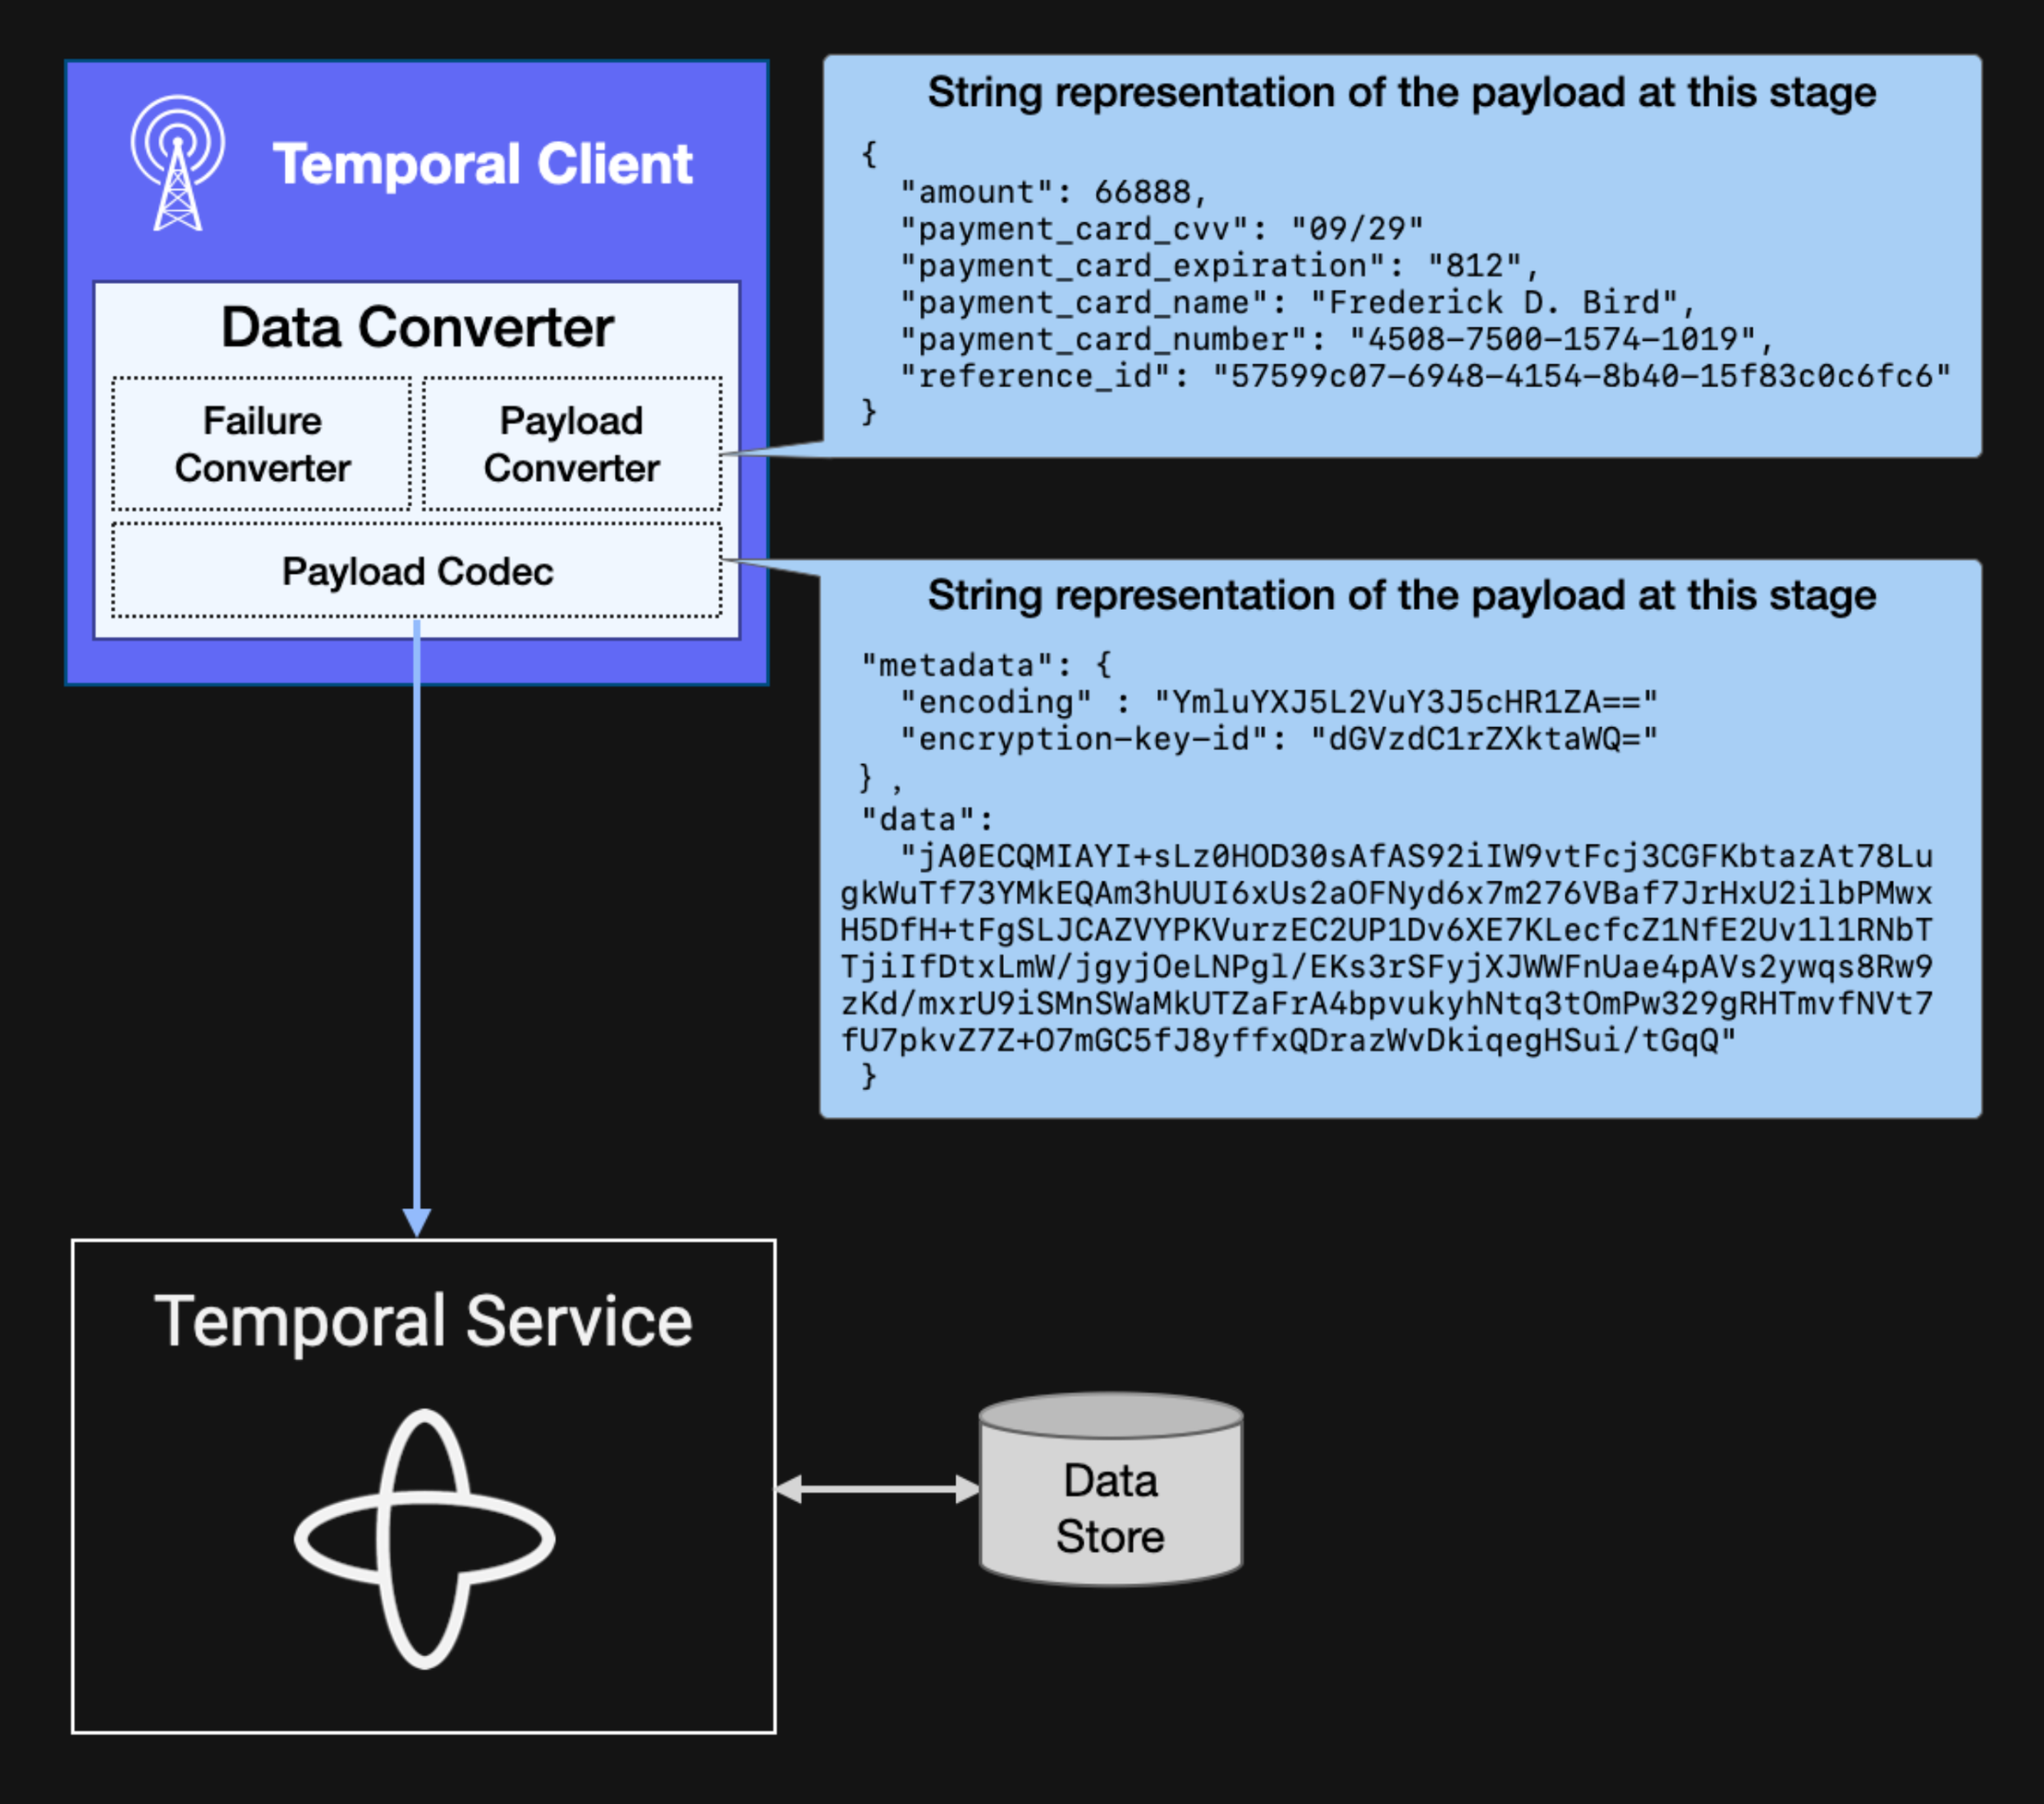
Figure 5: Illustration of the payload data at two points in the conversion process
Notably, the Failure Converter does not pass data through the Payload Codec, so sensitive information contained within error messages remains unencrypted by default even if you’re encrypting payloads. However, you can configure the Temporal Client to encrypt the Failure’s message and stack trace fields using the Payload Codec, as described in the Failure Converter documentation.
Now, let’s look at what the Temporal Web UI shows for a Workflow Execution that uses a Payload Codec for encryption. As you can see, both the input and output data are encrypted. Although not shown here, the same is also true for all information within the Event History, including the payment card details passed as input to the Activity that charges the customer for the purchase.
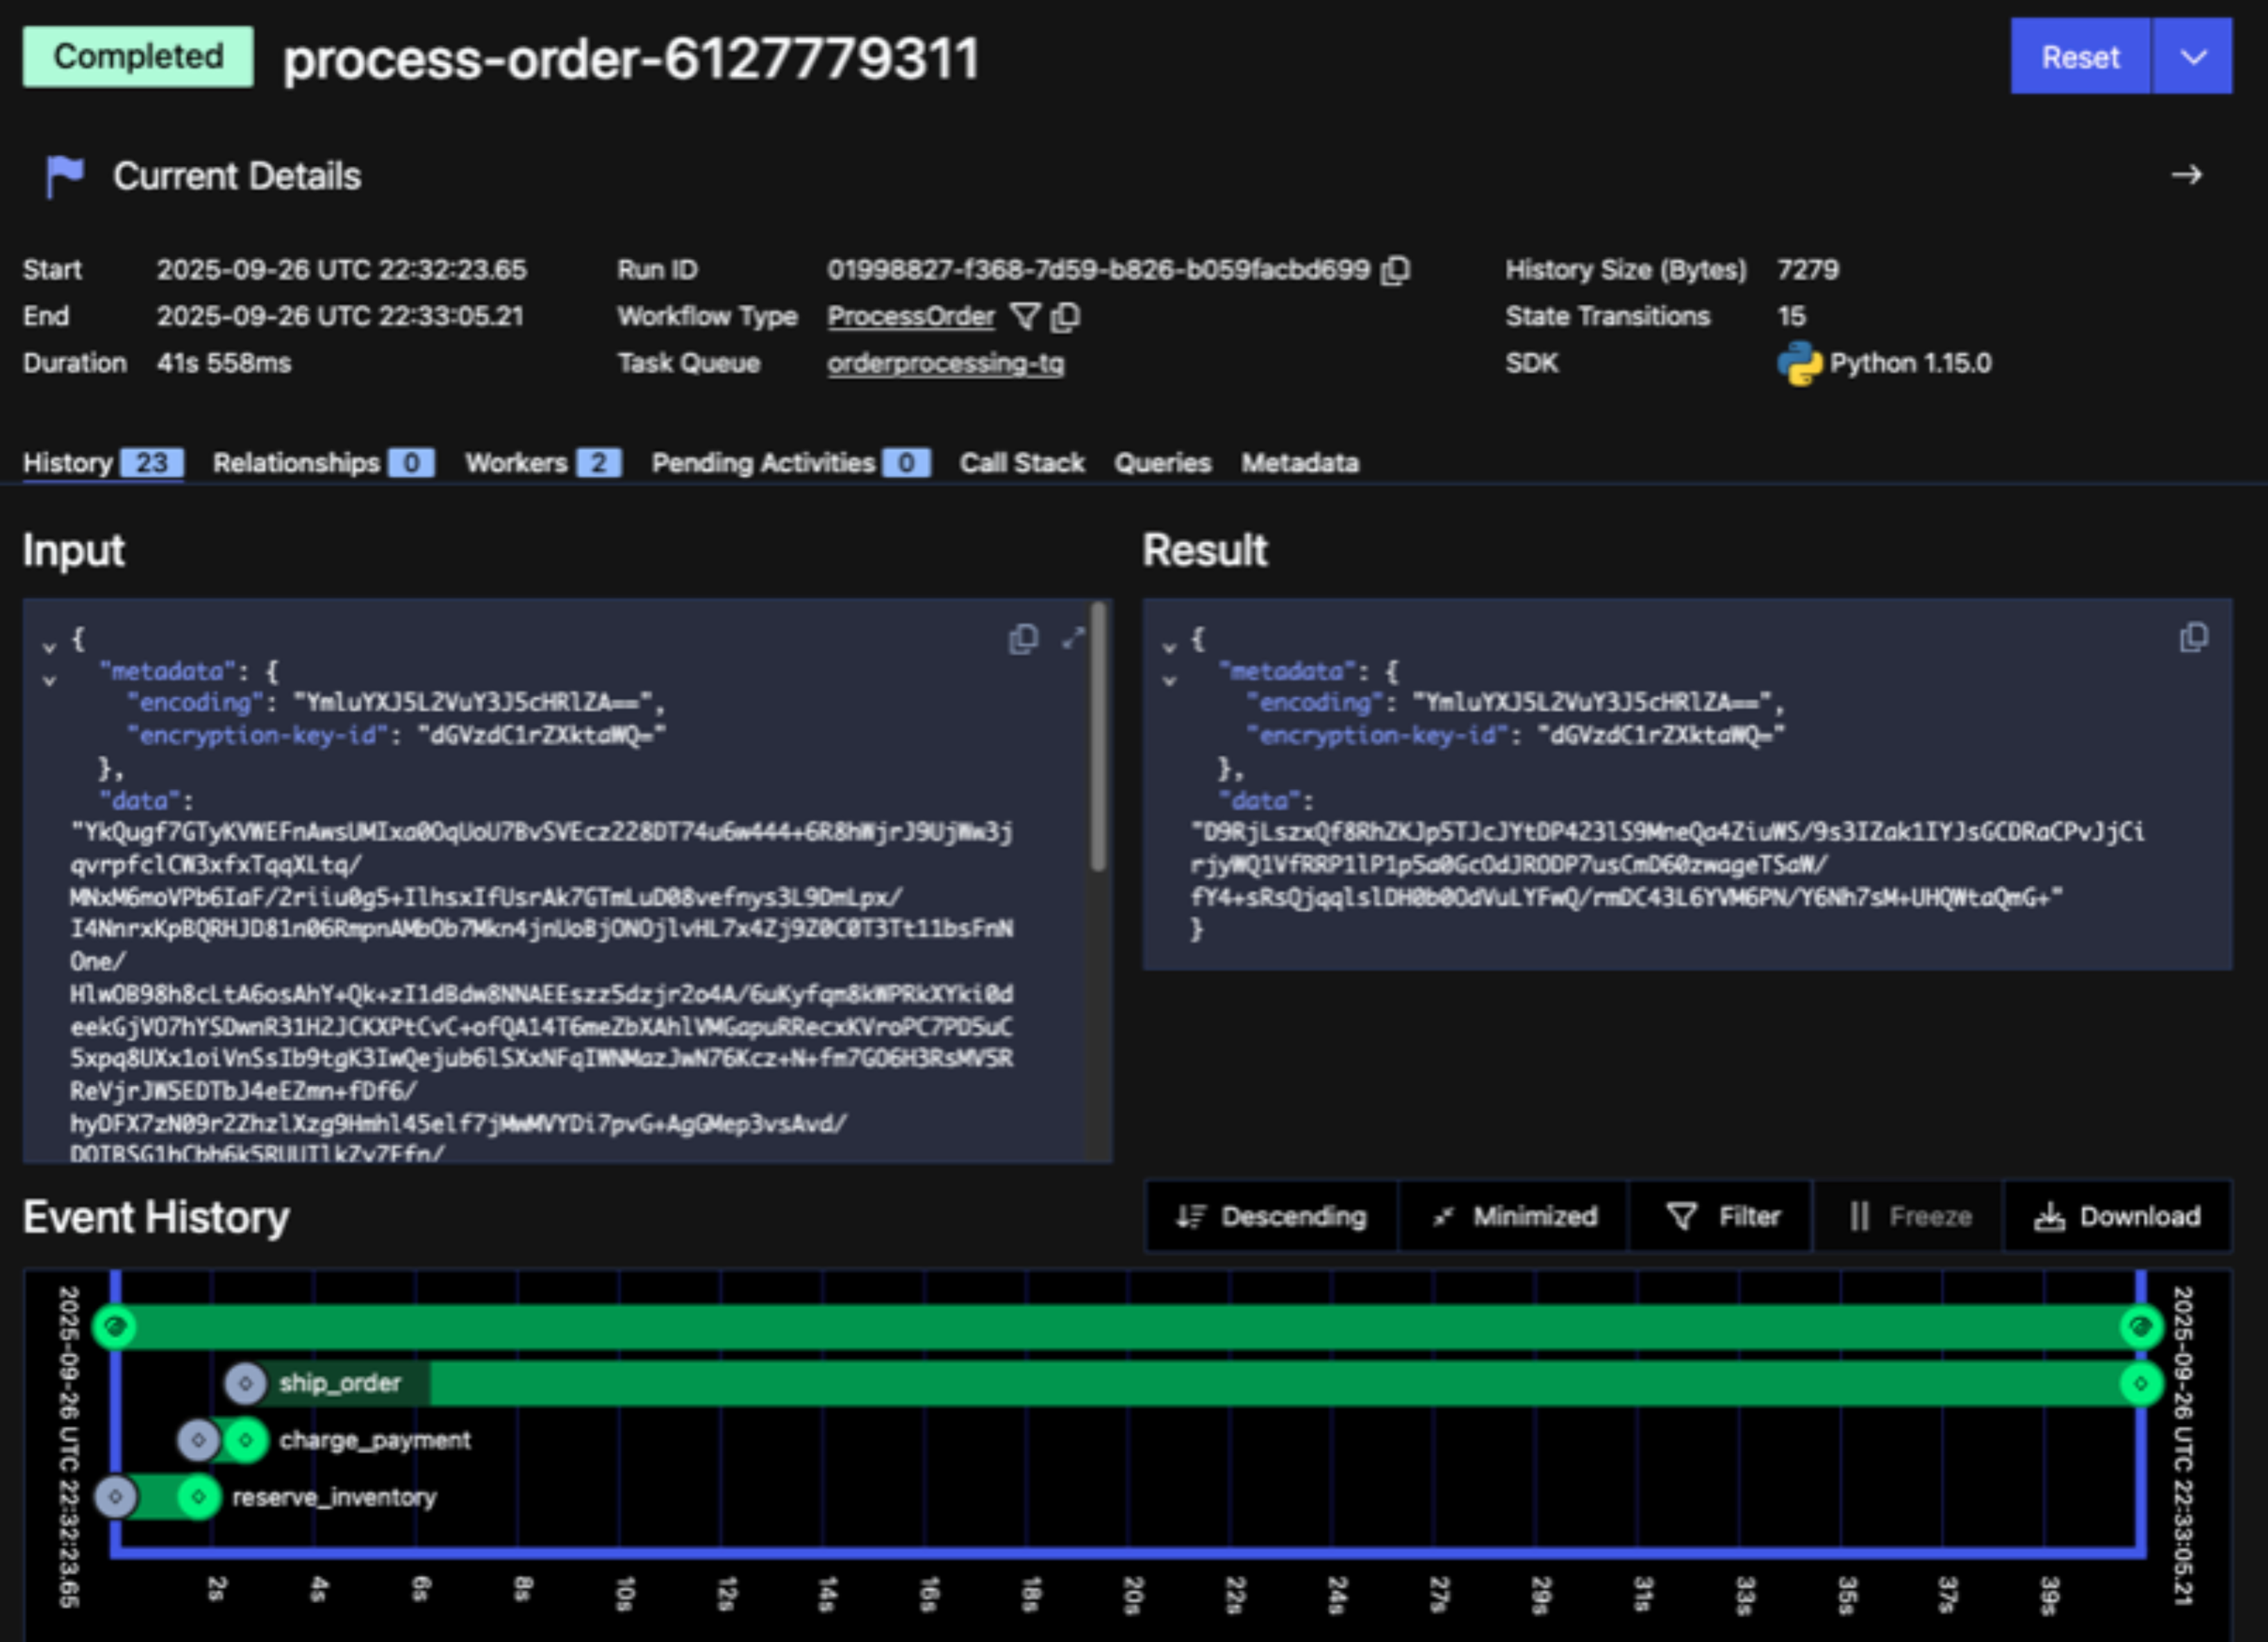
Figure 6: Screenshot showing encrypted information in the Web UI
Temporal’s design, which allows a Temporal Client to encrypt payload and failure data before it’s transmitted, ensures that the Temporal Service only ever sees encrypted data. From the perspective of the Temporal Service, this data is just a bunch of bytes. The Client is responsible for decoding those bytes, while the application that uses the Client (such as the Worker) is responsible for interpreting the underlying data.
Using a Payload Codec to replace data#
A Payload Codec isn’t limited to performing encryption. It simply transforms one series of bytes into another. With that in mind, consider that the best way to protect confidential data is to avoid transmitting it in the first place.
You can use a Payload Codec to replace data with a token (such as a UUID) before transmitting it and then perform the reverse transformation on data sent in the response. This requires a system that your application can use to map the UUID to the original message and back again. Choose a highly available system (such as a clustered transactional database) that can handle peak demand without becoming a bottleneck or single point of failure.
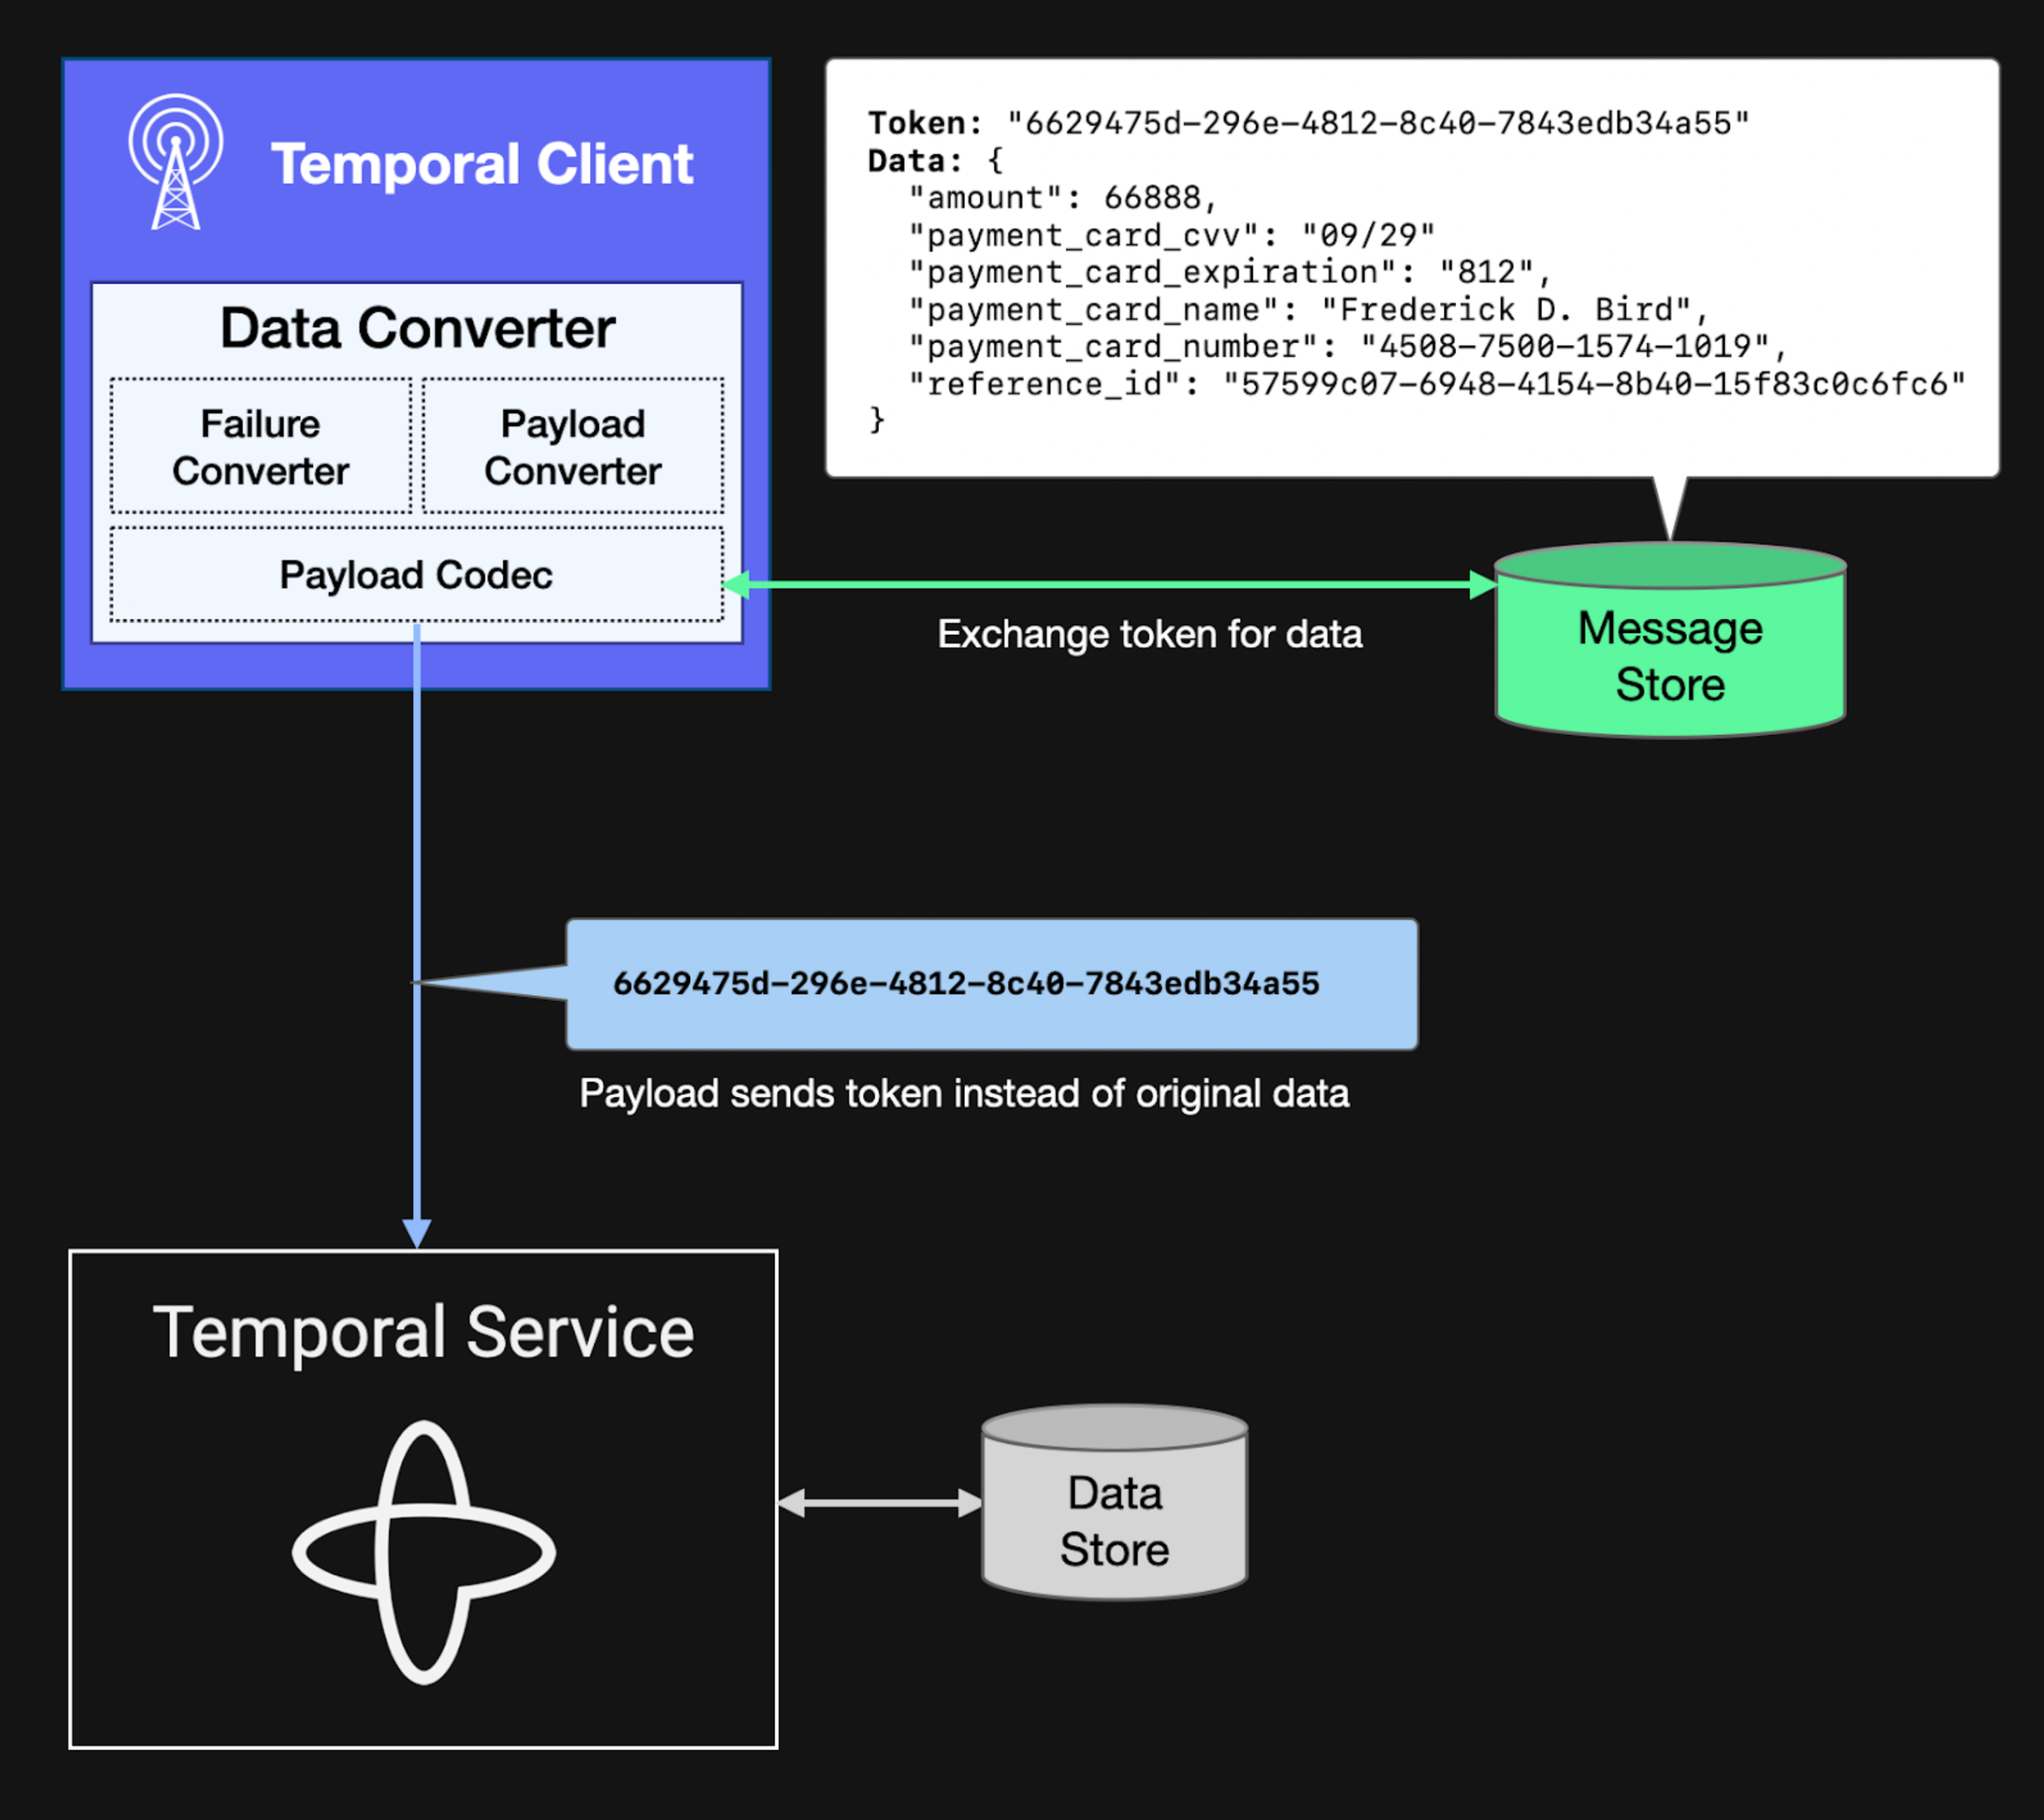
Figure 7: Diagram illustrating how a Payload Codec can perform token substitution
Another benefit of this approach is that it can significantly reduce overall payload size, thus avoiding the limit enforced by the Temporal Service. This is evident in the screenshot below, which shows payload data from the order-processing Workflow when using this type of codec. The data, which is Base64-encoded, is a UUID that maps to payload data inserted into the message store.
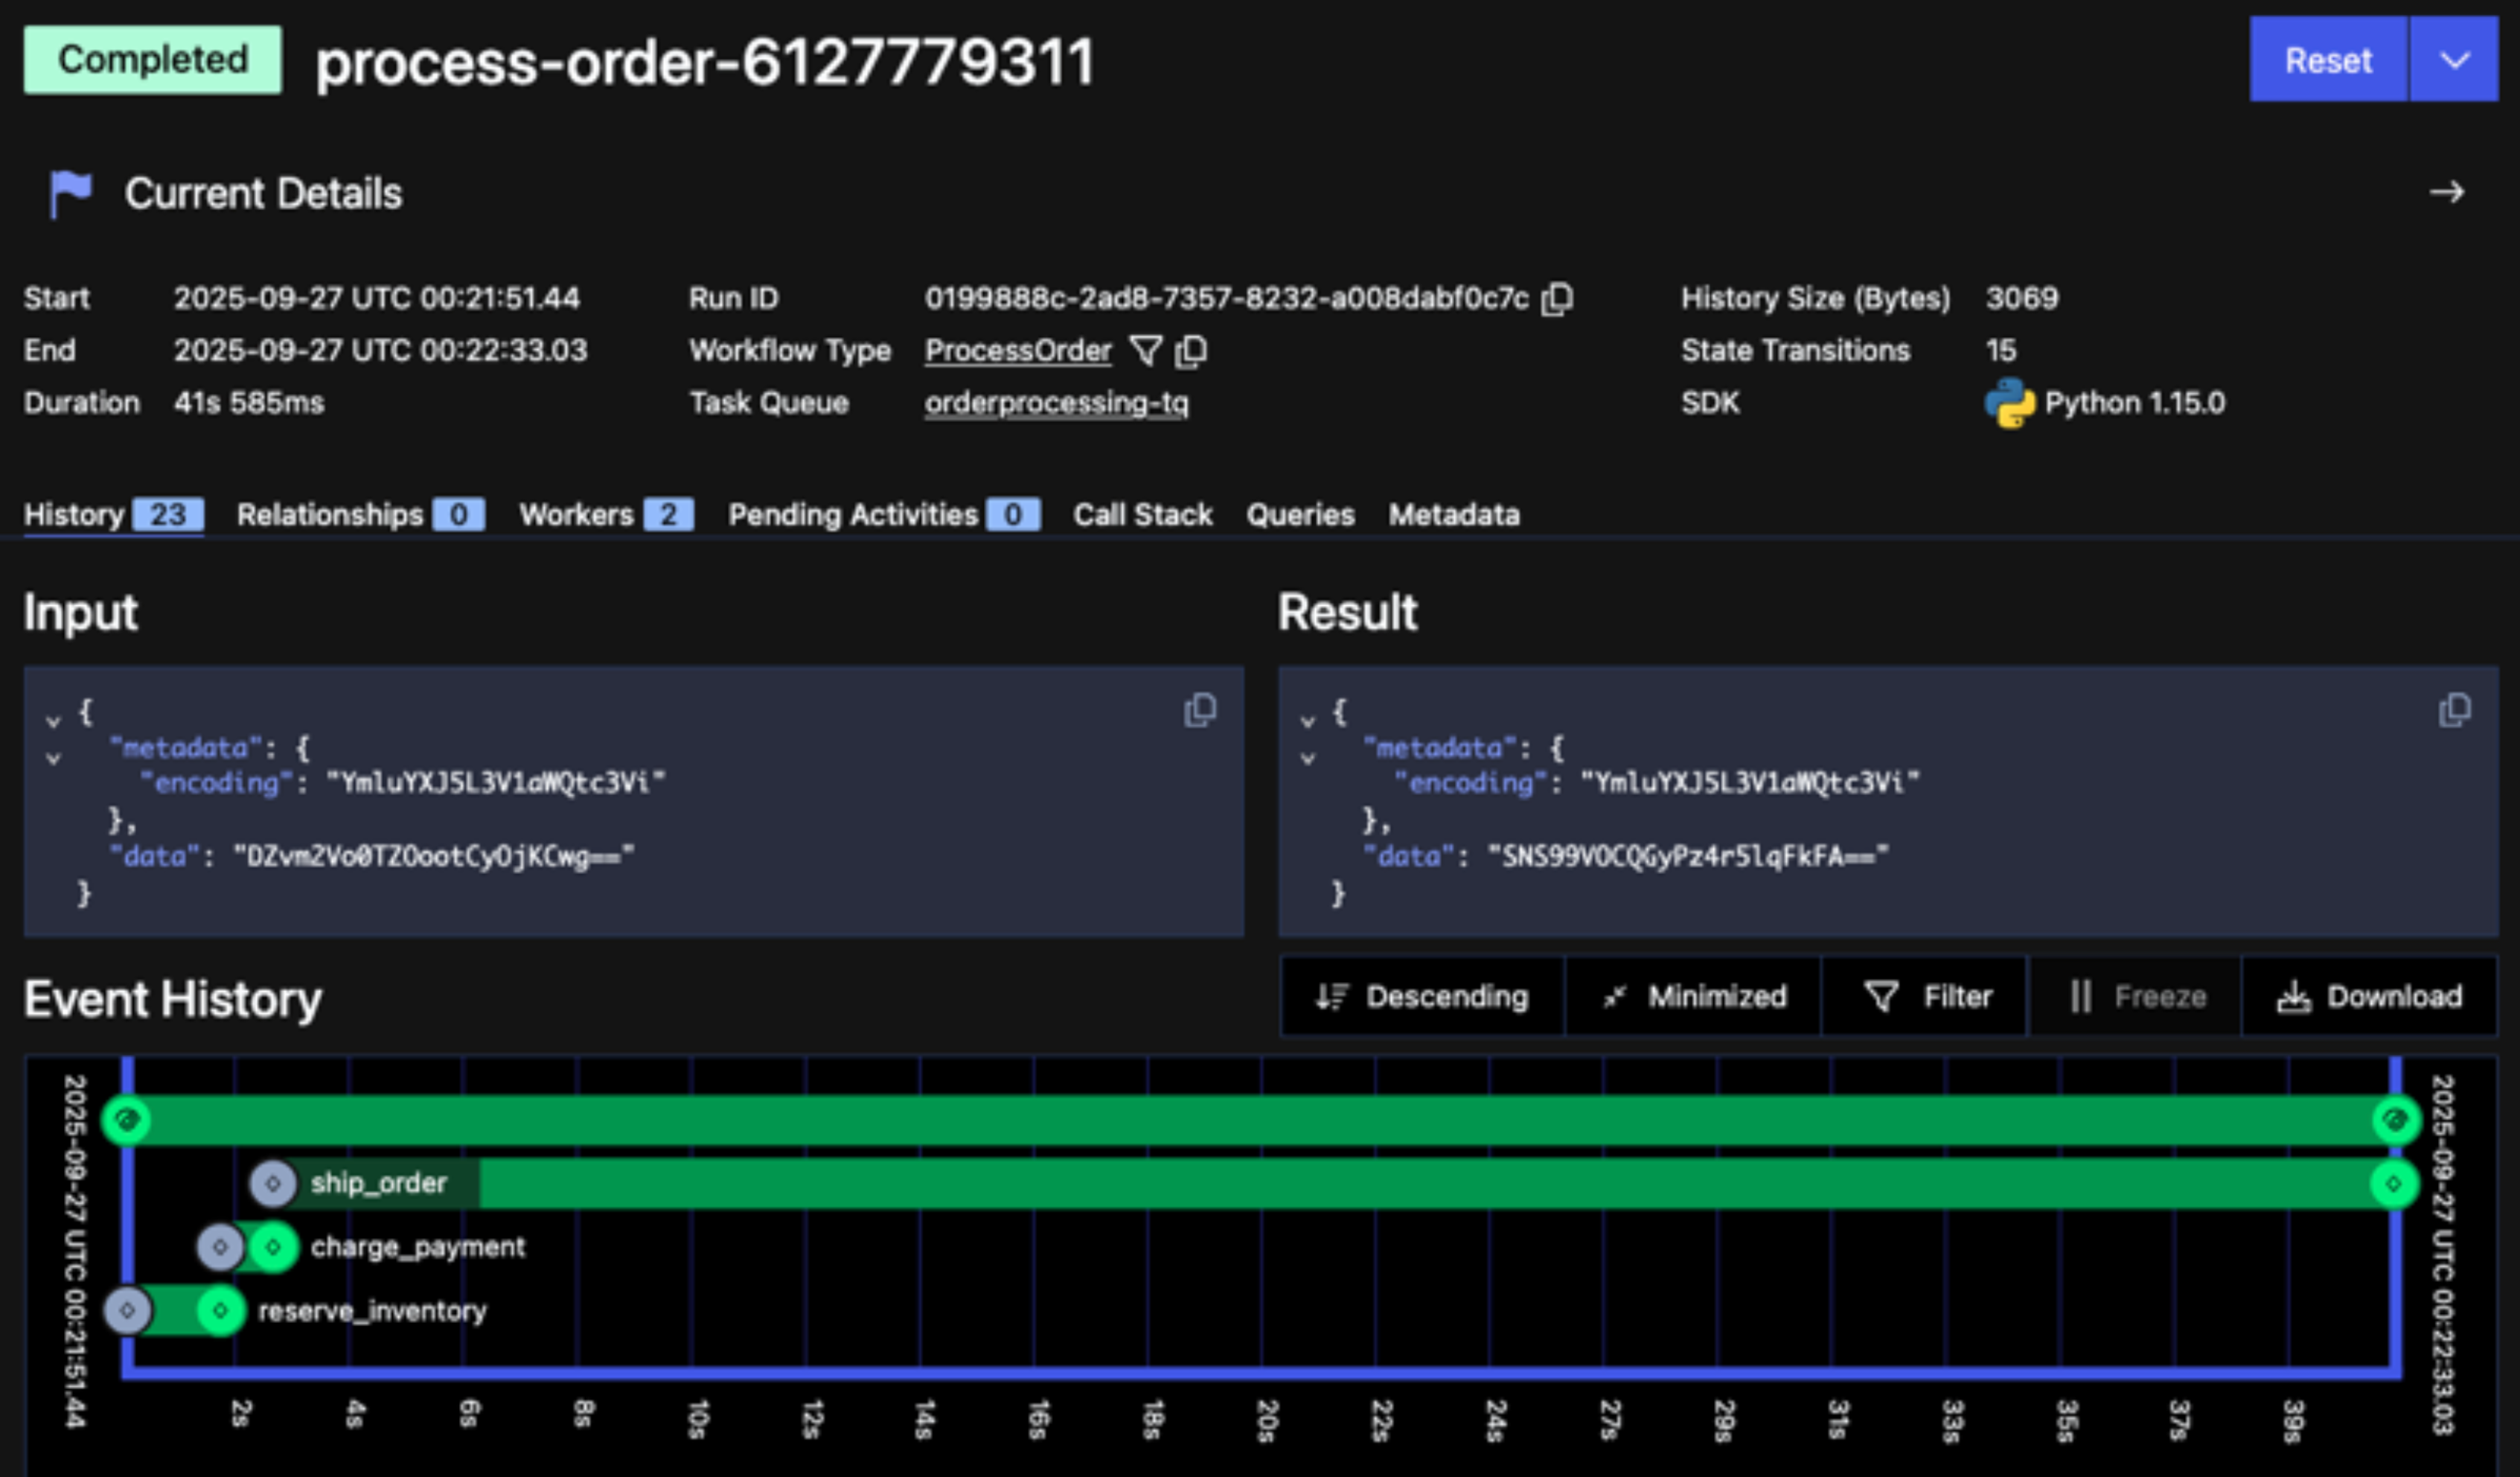
Figure 8: Screenshot of the Temporal Web UI showing data transformed by a Payload Codec that replaces the payload with a UUID
Confidentiality and observability: The role of the Codec Server#
Observability is one of Temporal’s most important benefits. If you’ve ever used Temporal’s Web UI or CLI, you know that having the ability to see precisely what took place during every execution is like having a superpower. Yet, as you can see from the last two screenshots, using a Payload Codec to protect the data has rendered it unreadable.
Does that mean Temporal forces you to choose between confidentiality and observability? Absolutely not!
A Codec Server gives you the best of both worlds. It’s a simple application that you write and run on a machine you control, and it makes your Payload Codec available over HTTP. You configure the Temporal Web UI to use it, and when you view a page containing data encoded by your Payload Codec, JavaScript in your browser passes the encoded data through your Codec Server and then displays it to you. The decoding happens entirely on the client side, so neither the Temporal Service nor the server-side components of the Temporal Web UI are involved in this communication.
The diagram below illustrates the data flow involved in displaying a page in the Temporal Web UI. The Temporal Service first loads the relevant information from the data store and provides it to the Web UI server, which produces the HTML and JavaScript that it serves to the client. The Web browser passes the encoded data to the Codec Server (which, like the browser, is running locally on the developer’s workstation). The data remains encoded for all steps (1–4) leading up to this point; step 5 is where it’s decoded and rendered within the browser using client-side JavaScript.
Figure 9: Diagram illustrating how the Codec Server decodes data from the Temporal Web UI
The diagram above depicts a Codec Server running on the developer’s own workstation, a common scenario during the development stages of a project. In production, the Codec Server might be deployed to a machine on a separate network, where it can access a key management server (KMS) and allow connections only from approved hosts. Additionally, you can configure the Temporal Web UI to include a JWT access token and/or cross-origin credentials, which you can use to authenticate and authorize requests sent to your Codec Server.
How does the browser know where to find the Codec Server? You configure this by clicking the eyeglasses icon near the upper-right corner of the Web UI, which displays the page shown here.

Figure 10: Screenshot of the Temporal Web UI Codec Server configuration page
If the “Pass the user access token” option is enabled, the Temporal Web UI will include a JWT access token in the Authorization header of each request it sends to your Codec Server. This allows you to authenticate and authorize requests, ensuring that only permitted users can decode sensitive payloads.
If the “Include cross-origin credentials” option is enabled, the Temporal Web UI will include cross-origin credentials (such as cookies) in requests sent to your Codec Server. This is necessary if your Codec Server uses browser-based authentication mechanisms or needs to verify the origin of requests.
The Temporal CLI also supports the use of a Codec Server. Here’s the result for this Workflow Execution without using the Codec Server, which corresponds to Figure 8:
$ temporal workflow result --workflow-id process-order-6127779311
Results:
  Status          COMPLETED
  Result          "metadata":{"encoding":"YmluYXJ5L3V1aWQtc3Vi"},
                  "data":"SNS99VOCQGyPz4r5lqFkFA=="}
  ResultEncoding  binary/uuid-sub
Here’s the same command, updated to specify the Codec Server address:
$ temporal workflow result --workflow-id process-order-6127779311 --codec-endpoint http://localhost:8081
Results:
  Status          COMPLETED
  Result          "Order paid (Confirmation #: 31415926535) and
shipped (Tracking #: TT8675309)"
ResultEncoding json/plainConclusion#
In this article, we explored the data flow in a Temporal Application and explained several ways to protect confidential information. Temporal’s layered approach to data security gives you the flexibility to choose a solution that best meets the needs of each application independently. Based on your specific requirements, you may wish to:
Use TLS to protect data in motion#
TLS can be an effective way to protect data in motion. It encrypts communications between Temporal Clients and the Temporal Service, mitigating eavesdropping by an attacker who has gained access to the network. However, since the data is only encrypted between the two endpoints of the connection, TLS does not protect data beyond those endpoints. With TLS alone, an attacker who gains access to the Temporal Service or its data store could read sensitive information in unencrypted form.
Use a Payload Codec to protect data throughout the system#
A Payload Codec lets you transform data before it’s transmitted and after it’s received. This enables developers to choose between two application-level approaches to data security:
- Encrypting sensitive data: You can use a Payload Codec to encrypt the data on the application side using your own key and preferred cipher. This ensures that the Temporal Service only receives, and therefore only stores, encrypted data. Because the Temporal Service does not know the cipher nor has access to the encryption key, this can be an effective mitigation against an attacker who gains control of the service or its data store.
- Replacing sensitive data with a token: An alternative to encryption is to use a Payload Codec to replace the actual payload with a token, such as a UUID, before sending it, and then replacing the token with the original payload upon receipt. This can be an effective solution, although the developer must take care to design the system used to map tokens to payloads so that it does not negatively affect overall performance and availability.
Use a Codec Server to maintain observability#
Whether you use a Payload Codec for encryption or message substitution, you don’t have to sacrifice observability. Writing and running a Codec Server, which can decode payloads supplied in HTTP calls, allows you to perform client-side decoding of data shown by the Temporal Web UI or CLI.
How to learn more about security in Temporal#
We invite you to join the #security channel in the Temporal Community Slack workspace, where you can ask questions about what’s in this article or other aspects of security in Temporal. If you’re a Temporal Cloud customer with a Business, Enterprise, or Mission Critical support plan, you are also eligible for a code and design implementation review from a member of our Developer Success team.
Here are some resources that can help you learn more about data security in Temporal.
- Temporal Trust Center
- Temporal Cloud security model
- Temporal Cloud security white paper
- Code samples that demonstrate how to configure the Temporal Client for mTLS
- Code samples that demonstrate how to implement a basic Payload Codec
- The Order Management System (OMS) reference application contains a more comprehensive example of using a Payload Codec and Codec Server (in the Go SDK).
- These instructions explain how to use the application’s built-in support for payload encryption, which is demonstrated in this video. The portion of the video starting at 1:57 shows how to configure the CLI and Web UI to use the application’s Codec Server. Watching that part is a quick way to see a Codec Server in action.
- Temporal Cloud Security Overview (YouTube video by Solution Architect Peter Sullivan, which provides an overview of user, application, and data security in Temporal Cloud)